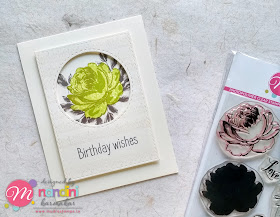
Hi! Nandini here with some fresh, new inspiration for the current Mudra Challenge #27 which is Geometric & Florals.
All of us love our floral stamps. Today I will show you how to add a touch of geometry to your floral cards. So grab your favourite beverage and get ready for a long post!
I started by stamping a bunch of cards with the floral image from the Sweet Rose stamp set. This is a gorgeous layered stamp which is very easy to line up. I just set up my stamp positioner and used different colour combos to stamp the flower towards the top of the card base. I masked the flower and then used the leaves from the Botanical Blooms from the set to stamp some foliage around the flower.
Card 1:
Border stamps in light inks can add a subtle geometric touch to your cards.
Card 2:
Another way of adding just a little bit interest is by using your scoring board.
Card 3:
Stencils are a great way of adding more interest to your cards.
Card 4:
Adding a frame always adds interest to the card design.
Card 5:
Nested dies in basic shapes are a fun way to add some detail to your cards.
I hope you enjoyed the different ways in which you can add some geometric touches to your floral cards. You can link your creations here.
I look forward to seeing your beautiful creations in our gallery.
Products Used:

India
International
The Craft Store, Srilanka
All of us love our floral stamps. Today I will show you how to add a touch of geometry to your floral cards. So grab your favourite beverage and get ready for a long post!
I started by stamping a bunch of cards with the floral image from the Sweet Rose stamp set. This is a gorgeous layered stamp which is very easy to line up. I just set up my stamp positioner and used different colour combos to stamp the flower towards the top of the card base. I masked the flower and then used the leaves from the Botanical Blooms from the set to stamp some foliage around the flower.
Card 1:
Border stamps in light inks can add a subtle geometric touch to your cards.
- Take a piece of cream cardstock and die cut a panel with a window.
- Stamp the border from the Warli stamp set with a very light ink to add a subtle geometric touch to your card.
- Stamp the sentiment from the Carnation stamp set with black ink.
- Mount the panel on some foam tape and adhere to the card base.
Card 2:
Another way of adding just a little bit interest is by using your scoring board.
- Take the stamped panel and place it on the scoring board with the envelope tool in place.
- Score diagonal lines across the panel, leaving the stamped areas free.
- Stamp the sentiment from the Magnolia stamp set with black ink on a scrap of cream cardstock.
- Round the corners of the sentiment panel and ink the sides with grey ink.
- Adhere the stamped and scored panel to a grey card base. Add the sentiment popped up on foam tape.
- To finish, adhere some half pearls at the intersections of the scoring lines.
Card 3:
Stencils are a great way of adding more interest to your cards.
- Take a cream card base and add some stencilling with grey ink. I used the lovely Memory Dots stencil.
- Trim the stamped panel and stamp the sentiment from the Carnations stamp set with black ink.
- Add the panel with some foam tape to the card base.
Card 4:
Adding a frame always adds interest to the card design.
- Take the stamped panel and add some stencilling with grey ink and the Memory Dots stencil. Use a finger dauber as it gives more control and you don't need to mask your stamping.
- Trim the panel and mount it on a black card base.
- Create a frame by die cutting a panel and heat embossing it with a metallic embossing powder. This is an excellent way to add some shine to your card.
- The frame is popped up on foam tape.
- Stamp the sentiment from the Magnolia stamp set with black ink. Trim the strip and add over the frame.
Card 5:
Nested dies in basic shapes are a fun way to add some detail to your cards.
- Die cut the stamped flower with a stitched circle die.
- Die cut two more circles and ink them directly with ink pads to get different shades of teal.
- Take a dark teal card base.
- Add some texture by inking through the Deco Patterns stencil.
- Layer the circles and adhere to the card base.
- Stamp the sentiment from the Carnations stamp set with black ink on a strip of cream cardstock with black ink.
- Adhere the sentiment strip to the card base with some foam tape.
I hope you enjoyed the different ways in which you can add some geometric touches to your floral cards. You can link your creations here.
I look forward to seeing your beautiful creations in our gallery.
Products Used:

Crafters Corner, India
Starbox, Chennai
Nagashri Arts, Bangalore
The Craft Store, Srilanka
Papercurves, UAE
Vivian Crafts, UAE
Scrapbook Boutique, Australia
Wild Warehouse, UK
www.mudrastamps.in (Exclusively for International Customers)
Love,
Nandini


Beautiful cards !
ReplyDelete