Hi Crafters,
Sathya here today from Paperie Expressions.
For today's post, I have made 3 cards focusing Stencil Sponging. Sponging over Stencils is a pretty basic way to use. Stencils can also be used for mists/sprays or to apply the texture pastes to get the desired patterns. For which, whole stencil or a portion can be used to create the focal image or even a background.
Always start loading the sponge with the ink and lightly sponge over the stencil in one direction only. Once a layer of ink on your cardstock is dried, you can sponge over top with more inks and more pressure to intensity to get a layered look.
Made a card in my blog using same technique. Check here if you wish to see the card.
Went ahead and colored the sponged areas of the stenciled portion to make my focal images.
Over to the projects!
India
Crafters Corner, India
Hndmd
The Craft Shop
Anandha Stationary
Hindustan Trading Company
Starbox, Chennai
Nagashri Arts, Bangalore
Connect4sale, Chennai
International
Kat Scrappiness
The Craft Store, Srilanka
Papercurves, UAE
Vivian Crafts, UAE
Scrapbook Boutique, Australia
Wild Warehouse, UK
Sathya here today from Paperie Expressions.
For today's post, I have made 3 cards focusing Stencil Sponging. Sponging over Stencils is a pretty basic way to use. Stencils can also be used for mists/sprays or to apply the texture pastes to get the desired patterns. For which, whole stencil or a portion can be used to create the focal image or even a background.
Always start loading the sponge with the ink and lightly sponge over the stencil in one direction only. Once a layer of ink on your cardstock is dried, you can sponge over top with more inks and more pressure to intensity to get a layered look.
Made a card in my blog using same technique. Check here if you wish to see the card.
Went ahead and colored the sponged areas of the stenciled portion to make my focal images.
Over to the projects!
Stencil Sponging + Pencil Coloring
Florals stencil as Focal Image
Card 1
Card 1
Card 2
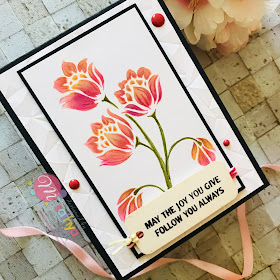
- For both Card 1 (Blossom stencil) and card 2 (floral mini stencil 6), sponged desired inks over stencils and layered the inks wherever necessary on to white cs.
- Then using Prisma colored pencils highlighted the stenciled portions .
- Then the focal panels are matted on to black cs.
- For card 1, the matted panel is added to 6" square card base.
- The black splatters are added for interest.
- For card 2, pink bakers' twine is added over the focal panel and then to white embossed panel for interest. Its then added to black A2 sized card base.
- Sentiments are added to mini Tag chipzebs using Mai -Jet black ink.
- Few enamel dots added as accents.
Pattern stencil as Background
- Took Yupo paper and played with alcohol inks in the colors Citrus and Lemonade.
- After its dried a bit, went over with a sponge dipped in blending solution and applied slightly over the Yupo paper using a Deco pattern stencil.
- This took off the inks ftom the stenciled portion and gave a cool patterned background.
- Leaves chipzeb is white heat embossed and added to the focal panel.
- Butterflies from Butterfly flutters stamp set are white heat embossed over vellum.
- Fussy cut and added to the panel.
- Sentiment from same stamp set is black heat embossed over vellum and strip is added to the focal panel and its then added to the kraft card base.
Hope you like today's cards!
Products used
India
Crafters Corner, India
Hndmd
The Craft Shop
Anandha Stationary
Hindustan Trading Company
Starbox, Chennai
Nagashri Arts, Bangalore
Connect4sale, Chennai
International
Kat Scrappiness
The Craft Store, Srilanka
Papercurves, UAE
Vivian Crafts, UAE
Scrapbook Boutique, Australia
Wild Warehouse, UK
www.mudrastamps.in (Exclusively for International Customers)
Thanks for stopping by!
Have a blessed day!
Cheers,
Sathya


Wow..what a beautiful set of cards Sathya !! Loved each one of them!
ReplyDeleteBeautiful coloring Satya
ReplyDelete